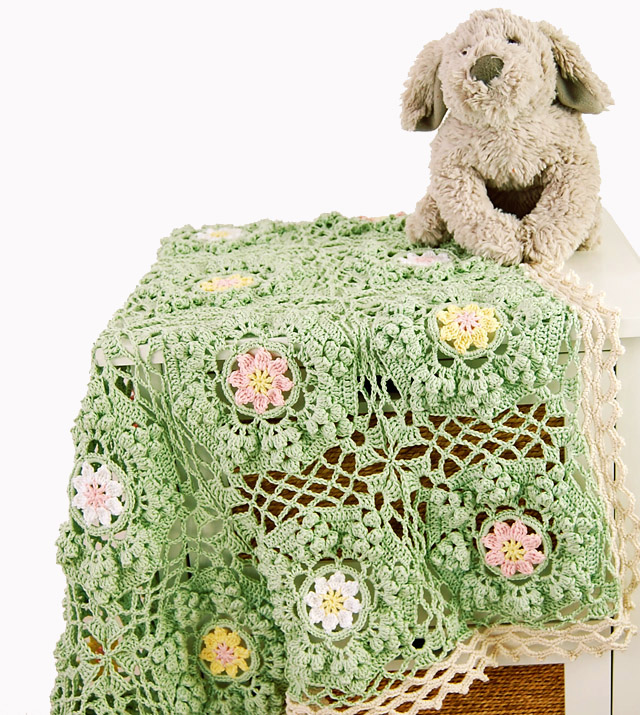
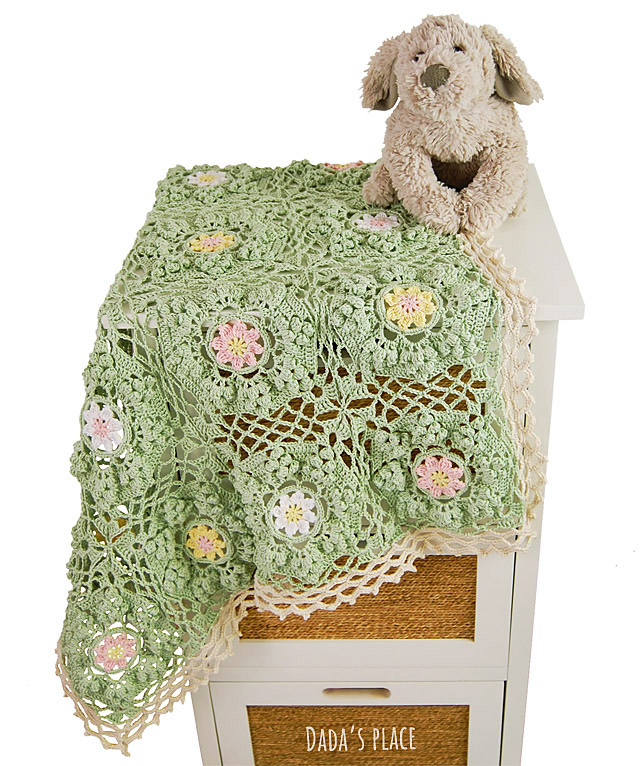
This crochet blanket is light and airy, it’s perfect for summer. Popcorn stitches give it a nice texture, as well as a vintage look. This blanket can also be a perfect handmade baby shower gift for any baby girl.
*
The pattern is written using US crochet terms.
Skill level: Advanced Beginner – Intermediate
Finished size if worked with suggested yarn: 80 x 80 cm (31.5″ x 31.5″)
Crochet hook: 3.5 mm (USA E-4 / UK 9)
Gauge: the square measures approximately 18 x 18 cm (7″ x 7″)
Yarn: For this blanket I used 100% cotton yarn “Tango” and “Golf” from St. George (125m/50g). Since that yarn isn’t available on line, I would like to recommend you 2 alternatives to the yarn I used.
The first one is Catona by Scheepjeswool. You can check out its gorgeous color palette here.
The second one is Catania by Schachenmayr. It also comes in variety of colors, which you can see here.
You will need approximately:
* White: 10 g
* Cream: 70 g
* Pale yellow: 15 g
* Pale pink: 15 g
* Pale green (or any other main color): 340 g
In this first part of the tutorial I will show you how to make the square. Don’t let the number of the photos discourage you. The square is actually simple to make, but I wanted to show you every little step on the way from the beginning to the end. I think that even beginners can make it quite successfully. Are you ready?
Let’s get started!
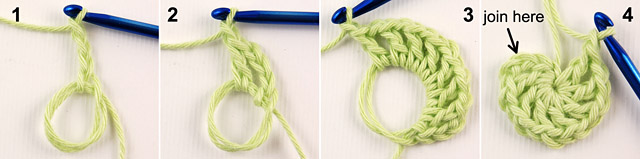
1. We will start with a magic ring. Make ch-4 in the ring. (counts as dc + ch-1)
2. Make * dc, ch-1;
3. Repeat from * 6 more times; you should have 8 dc with ch-1 between each dc;
4. Pull the yarn tail and close the ring.
5. Join with sl st to the third chain of the beginning ch-4. Fasten off.
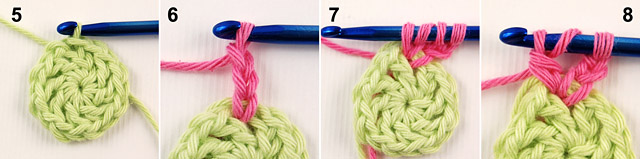
6. Insert the new color in any ch-1 space, and make ch-3. Now, we’re going to make a beginning cluster stitch – treble crochet four together (tr4tog).
7. We will make an “incomplete” tr, so yarn over twice, insert your hook into the same chain space, yarn over and pull up a loop (you should have 4 loops on hook)
8. yarn over, pull the yarn through two loops (3 loops on hook),

9. yarn over, pull the yarn through two loops (2 loops on your hook), and now stop. It’s an “incomplete” tr.
10. Make 2 more “incomplete” tr in the same space. You should have 4 loops on your hook.
11. Yarn over,
12. and pull the yarn through all 4 loops on the hook. You’ve just made a cluster.
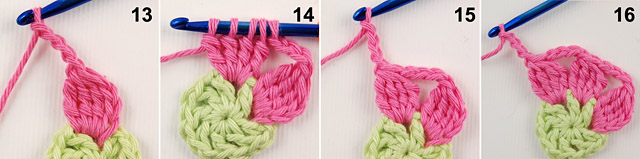
13. Make ch-4. Now we’re going to make another cluster.
14. Make 4 “incomplete” tr in the next ch-1 space. You should have 5 loops on the hook.
15. yo and pull the yarn through all 5 loops on your hook, ch-4;
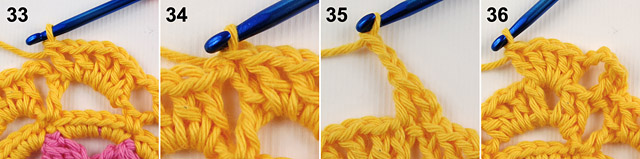
16. * Make a cluster (tr4tog) in the next ch-1 space, ch-4;
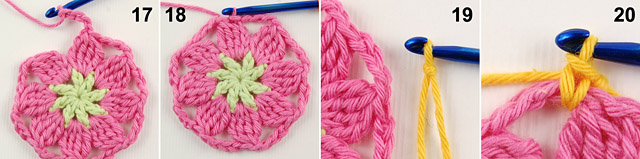
17. Repeat from * 5 more times. You should have 8 clusters with ch-4 between each cluster.
18. Join with slip stitch to the top of the beginning cluster. Fasten off.
19. Take the background color. Now, we’re going to make standing sc, so make a slip knot on your hook.
20. Make standing sc (insert your hook in any ch-4 space – next to the cluster, yo, pull up a loop, yo and pull the yarn through two loops on your hook).
21. Make 5 sc in the same space. (6 sc in total)
22. * Make 6 sc in the next ch-4 space;
23. repeat from * 6 more times;
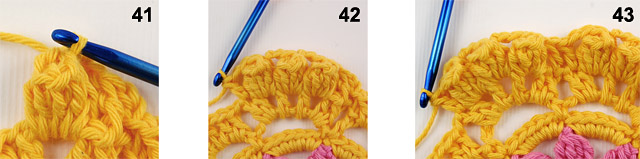
24. make sl st in standing sc, then make ch-7;
25. skip the next 5 sc, sc in the next sc;
26. * make ch-7, skip the next 5 sc, sc in the next sc;
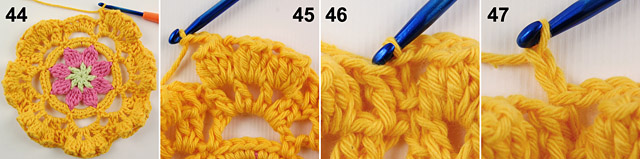
27. repeat from * 5 more times;
28. make ch-5,
29. dc in the beginning slip stitch.
30. Make ch-3 (counts as dc + ch-1).
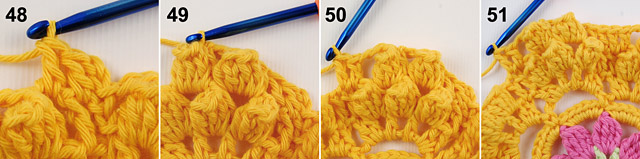
31. * Make [2 dc,ch-1,dc, ch-1, dc, ch-1, 2 dc] in the next ch-7 space, then make ch-1;
32. repeat from * 6 more times;
33. make [2 dc, ch-1, dc, ch-1, dc, ch-1, dc] in the next ch-5 space;
34. join with sl st to the second chain of the beginning ch-3;
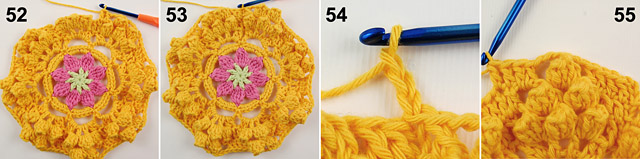
35. make ch-2 (counts as dc), skip the next ch-1 space, dc in the next dc, ch-3. Now, we’re going to make a Popcorn stitch;
36. skip the next dc and make 5 dc in the next ch-1 space;

37. drop the loop from your hook, and insert the hook (from front to back) through both loops of the first dc of the group of 5 dc;
38. grab the dropped loop with your hook,
39. yarn over,
40. and pull the yarn through all three loops on your hook.
41. The finished popcorn.
42. make [ch-3, skip the next dc, popcorn in the next ch-1 space] 2 times, ch-3, skip the next dc, dc in the next dc;
43. * skip the next ch-1 space, dc in the next dc, [ch-3, skip the next dc, popcorn in the next ch-1 space] 3 times, ch-3, skip the next dc, dc in the next dc;
44. Repeat from * 5 more times;
45. Skip the next ch-1 space, dc in the next dc, [ch-3, skip the next dc, popcorn in the next ch-1 space] 3 times, ch-3,
46. join with sl st to the top of the initial ch-2;
47. make ch-2 (counts as dc),
48. dc in the next dc, dc in the next ch-3 space,
49. [ch-3, popcorn in the next ch-3 space] 2 times,
50. ch-3, dc in the next ch-3 space, dc in the next dc,
51. * dc in the next dc, dc in the next ch-3 space, [ch-3, popcorn in the next ch-3 space] 2 times, ch-3, dc in the next ch-3 space, dc in the next dc;
52. Repeat from * 5 more times;
53. dc in the next dc, dc in the next ch-3 space, [ch-3, popcorn in the next ch-3 space] 2 times, ch-3, dc in the next ch-3 space; join with sl st to the top of the beginning ch-2;
54. ch-3 (counts as dc),
55. * dc in the next 2 dc, 2 dc in the next ch-3 space, ch-3, popcorn in the next ch-3 space, ch-3, 2 dc in the next ch-3 space, dc in the next 2 dc;

56. Repeat from * 6 more times;
57. dc in the next 2 dc, 2 dc in the next ch-3 space, ch-3, popcorn in the next ch-3 space, ch-3, 2 dc in the next ch-3 space, dc in the next dc, join with sl st to top of the beginning ch-3.
58. Make sc in the next dc, ch-6, skip the next 3 dc, sc in the next ch-3 space (next to popcorn),
59. sc in the next ch-3 space (right after popcorn), ch-6, skip the next 3 dc, sc in the next dc,
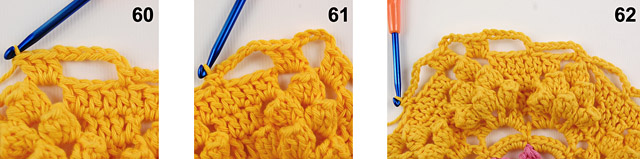
60. ch-6, skip the next 4 dc, 3 dc in the next ch-3 space,
61. ch-4, 3 dc in the next ch-3 space, ch-6, skip the next 4 dc, sc in the next dc,
62. * ch-6, skip the next 3 dc, sc in the next ch-3 space (next to popcorn), sc in the next ch-3 space (right after popcorn), ch-6, skip the next 3 dc, sc in the next dc, ch-6, skip the next 4 dc, 3 dc in the next ch-3 space, ch-4, 3 dc in the next ch-3 space, ch-6, skip the next 4 dc, sc in the next dc;
63. Repeat from * 1 more time;
64. ch-6, skip the next 3 dc, sc in the next ch-3 space, next to popcorn, sc in the next ch-3 space, right after
popcorn, ch-6, skip the next 3 dc, sc in the next dc, ch-6, skip the next 4 dc, 3 dc in the next ch-3 space, ch-4,
3 dc in the next ch-3 space, ch-3,
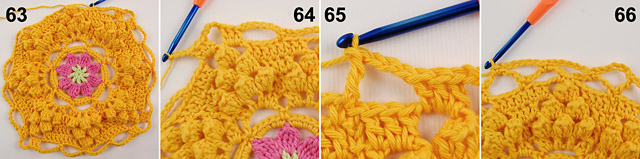
65. tr in the beginning sc;
66. [ch-6, sc in the next ch-6 space] 3 times,
67. ch-4, skip the next 3 dc, [4 tr, ch-4, 4 tr] in the next ch-4 space, ch-4, skip the next 3 dc, sc in the next ch-6 space,
68. * [ch-6, sc in the next ch-6 space] three times, ch-4, [4 tr, ch-4, 4 tr] in the next ch-4 space, ch-4, sc in the next ch-6 space;
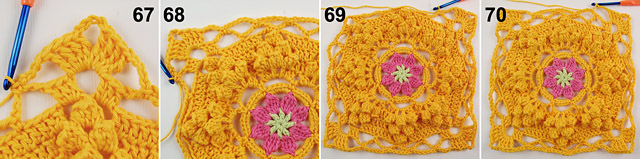
69. Repeat from * one more time;
70. [ch-6, sc in the next ch-6 space] three times, ch-4, [4 tr, ch-4, 4 tr] in the next ch-4 space, ch-4. Now, we’re going to make an invisible join.
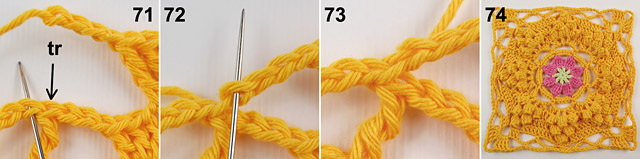
71. Cut the yarn and pull it through the stitch. Thread the tapestry needle. Insert your needle through the first stitch after tr, from front to back and pull it through.
72. Insert the needle back, in the last stitch you made, through the back loop only, from front to back, and pull it through.
73. This is how invisible join looks like. Weave in the ends.
74. Congratulations! You’ve just finished your first square!
Next time I will show you how to join the squares. We’re going to join them using as-you-go method, so if you’ve decided to make this blanket, please don’t make a bunch of squares while you’re waiting for the joining tutorial to be publish. You will need only one square completely done. You’ll finish the other squares while joining them together. So be patient. The next part is coming very soon…
*
Update: The second part of the tutorial – How to join the squares is now available. Click here to check it out.
The third part – How to make the border is now available HERE.
*
Beautiful
Thanks Diane!
I love it
Thanks Maryann! I’m glad you like it!
Absolutely beautiful, thank you so much for sharing and your wonderful instructions. Xx
Thank you so much Caroline! Glad you like it!
So pretty ?. How can I email that I received your next step video?
Thank you Sadie! You can sign up for my newsletter, so you won’t miss any of my future projects and sales.
Thank you so much for sharing and for all the pictures. This is absolutely beautiful.
You’re welcome! Thank you Linda!
Perfection
Thanks Helen!
I’m super excited to create another one of your blankets ❤️
Great! Happy to hear!
So excited to start this blanket! Thank you, for sharing your beautiful pattern. You are so very talented!
You’re welcome! Thanks Suzanne!
❤️❤️
Hello Dada
Beautiful Pattern thank you, but i cant seem to find the third tutorial for the completion of the border. Where can i find it please?
Have a lovely day!
Barbara
Hi Barbara,
Thanks, glad you like the tutorials. The final part of the How to be a wildflower blanket will be on my blog on Monday.
xo D
So lovely . looking forward to tbe final part to complete border . when will that be released please?
Thanks Dawn! Glad you like it! The tutorial for the border will be released on Monday.
Thank you so much for this beautiful pattern.
You’re welcome!
Loooove it ?